Here are the gazebo blueprints and plans for a hexagonal gazebo!
Step 1: Build the base
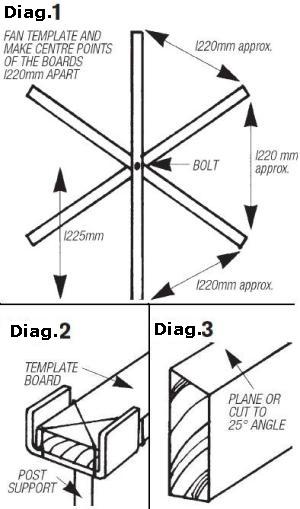
The very first step is to level and clear the site for construction the gazebo. Next, build a template for locating the base of the gazebo accurately. Cut 3 wooden boards of size 2450 mm x 90mm x 19mm paying special attention that they are perfectly straight.
Find out and mark the exact center of the boards in terms of both width and length, then clamp the boards together. Drill a hole of about 6mm through the center of the boards and fix them loosely together with nut and bolt. Lastly, measure the exact center of each board at its end and mark it.
Step 2: Mark the foundation
Now you can fan the template out on the construction site such that the center points you marked earlier along the edge of the boards are all about 1220 mm apart. Fix the position of the boards firmly by tightening the nuts. Mark the ground at the end of each of the boards to mark the position for the foundation posts.
==> Click Here to View 12 Detailed DIY Gazebo Plans
Step 3: Lay the post supports
Make sure you follow the gazebo plans carefully which digging the foundation. This is extra important! Dig the foundation holes of a depth of about 450 mm. Tie the post supports with string or wire to the end of the boards forming the base of the gazebo and ensure that the outer edge of each post support is exactly level with the board’s edge. Lay the base template boards with the post supports in the foundation holes. Fill the foundation holes with concrete and adjust the location of each post support after the final hole has been filled. Leave the concrete to set for a day.

Step 4: Build the perimeter beams
Use a power saw attached with a power planer to cut the upper surface of the perimeter beams at a an angle of 25 degrees. Draw a line along the face of one of the beams at one end using a square. Set your power saw to and angle of 30 degrees and chop this off. Placing the beam along the template, align the cut end to the centre mark on the template arm and make the inner edge of the perimeter beam touch the corner of the arm (Diag. 4).
Mark the outside face of the beam’ other end where it touches the central line of the opposite template board (Diag. 5). Chop square over this mark at an angle of 30 degrees. Repeat this for all the perimeter beams, working your way about all arms of the template. The length of all beams should be the same, but more importantly they should all match the length of the locations of the post supports.
Step 5: Make the foundation posts
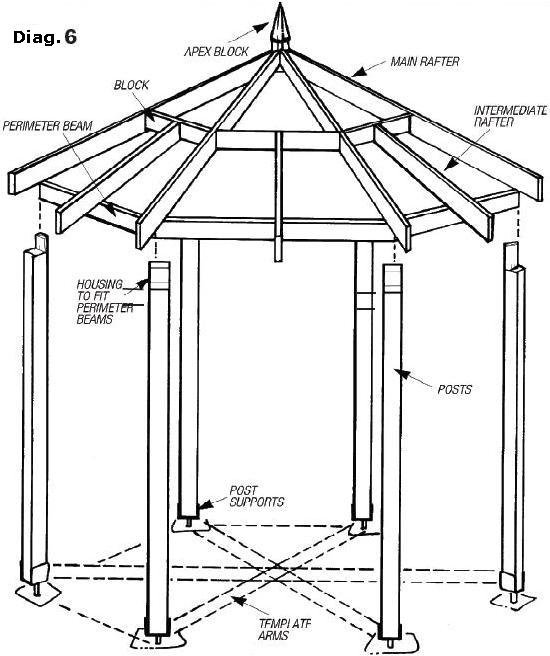
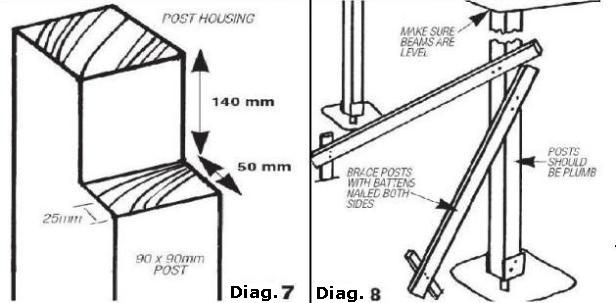
Make sure each foundation post is of the same height, else cut them to adjust it and make them all equal. Mark on the top of each of the foundation posts where the cuts are to be made and then cut out the housing for the beams (Diag. 7). Use your saw to cut several cross cuts of depth 50mm to the 140mm mark. Mark and then cut down along both sides till the 140mm mark is reached. Chisel out the waste wood.
Step 6: Attaching the Beams to the foundation posts
Place two posts with their housings pointing upwards. Then place the beam inside the post housings, such that the posts and beam are at right angles, and then clamp it in position. Make two holes of 5mm each at a distance of 45 mm from the end and 25mm from top of each beam and bottom through into the foundation post and secure using galvanized screws. Repeat this with every posts and its neighboring beams.
Using someone’s help, attach the completed frame in the proper post supports. Verify that the posts are vertical and the beams are horizontal and are in a common straight line. Secure each post by using battens on both sides (Diag. 8). Then attach the second beam and post frame similarly and then drill and screw the beam in between the two frames. Next, prop the remaining frame and beams similarly.
The posts may not be straight now, so re-support them as needed till they are all straight in every direction. Drill into the post supports till you reach the base of the post, and then fix the coach bolts and nuts, and then tighten it. Secure the structure firmly while you are working on the frame of the roof. The outside edge of the beams should be of the same length where they are attached to the posts.
Step 7: Constructing the roof
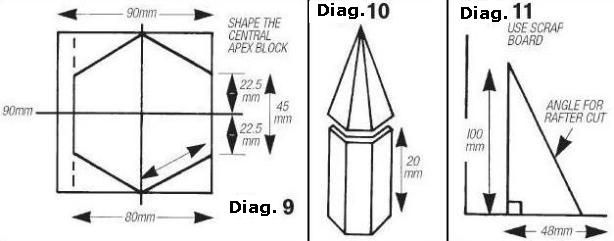
Start by making a central apex block to make a flat attaching point for every rafter. Chop the 90×90 mm wooden block to a length of 550 mm. Saw off 10 mm from a side so that it now measures 90mm x 80 mm. Mark and cut an end as shown in (Diag. 9). You can also double the top as a finial (Diag. 10). Next, cut 6 rafters to 1475 mm long including an overhang of 100 mm outside the front surface of each of the perimeter beams.
Cut the rafter ends at an angle to give a slant to the roof. Mark the proper angle on a piece of board (Diag.11), and set your sliding bevel to this angle and transfer it to both the ends of every rafter (Diag. 12). Once you are finished cutting, attach two opposing rafters to the apex block using 100 mm screws (Diag. 12). Once it is assembled, raise the frame into proper position using someone’s help and secure each rafter to the beams by drilling angled holes through the rafter into the beams, then use galvanized screws to secure it. (Diag. 13). Finally, fix the blocking in between the rafters (Diag. 6).
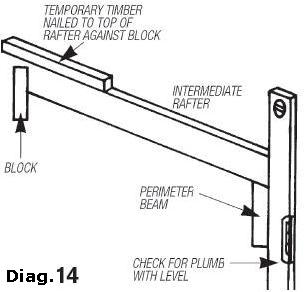
Mark a distance of 500mm down from the apex of the roof on both sides of every rafter. Setting your power saw at an angle of 30 degrees cut 140 mm x 45 mm blocks that fit in between each rafter pair. Secure it using oblique nailing into the rafters, ensuring that they remain straight. Lastly, attach the middle rafters. Begin by making a mark at the center of both the blocking beam and the perimeter beam in between every pair of rafters. You can nail one scrap board to the upper edge of the middle rafter at one end and fasten it against the blocking temporarily (Diag. 14).
Put a spirit level on the perimeter beam and mark the exact location of the middle rafter. Adjust the bevel according to this mark, then transfer this same angle to the rafter end and slice off square. You can temporarily attach a straight timber piece at the ends of two adjacent primary rafters. Place the angular end of the middle rafter to the block then mark its length at the place where it joins the temporary timber bracing and cut the angle square. Attach it by nailing to the blocking and oblique nailing to the perimeter beam.
Step 8: Attach the roofing
It is easy to install weatherboards made of cedar. They require hardly any maintenance and they also give a traditional and rustic appearance to the gazebo. You could also consider a polycarbonate product which is clear for letting the light in. Once you have made the choice, fix your roofing in position. Next, mark across the central line of each main rafter using a straight edge before you start cutting.
Step 9: Attach the Handrails
You should leave at least two opposite sides of the gazebo open for ease of access. Skew nail the upper rail to the foundation posts using 75 mm hot dipped galvanized nails at a height of 850 mm above the ground level and attach the bottom rail about 740mm below it. The balusters are attached using two 40 mm hot dipped galvanized nails at the top and bottom about 50 mm apart. You can also fix diagonal bracing from corner to corner, with one piece in front of other.
Hope you found these gazebo plans really useful. To get even better and more detailed professional gazebo plans. Visit..

Need more gazebo designs? Here are some square gazebo plans!


